How to install Chunk Pregenerator Mod 1.16.5 | 1.17.1 (Pregenerate Worlds)
Follow 5 steps below to install Chunk Pregenerator Mod 1.17 | 1.16.5 (Pregenerate Worlds) :
1. Ready installed Minecraft Forge.
2. Download a Forge compatible mod from url download, or anywhere else!
3. Open Minecraft game, click ->> ‘Mods’ button from main menu, click – >> ‘Open Mods Folder’.Important: Some older versions of Forge may not have the ‘Open Mods Folder’ button. If that is the case, you will need to find the folder manually. Windows:
- Press the Windows key and R at the same time
- Type %appdata% and press enter
- Find folder Minecraft and then look for the Mods folder within that
Mac:
- Click on the desktop and then press Command+Shift+G all at the same time
- Type ~/Library and press enter
- Open the folder Application Support and then Minecraft
4. Place the mod file downloaded (.jar or .zip) into the Mods folder.
5. Run Minecraft, and you should now see the new mod installed in the list!
Screenshot :
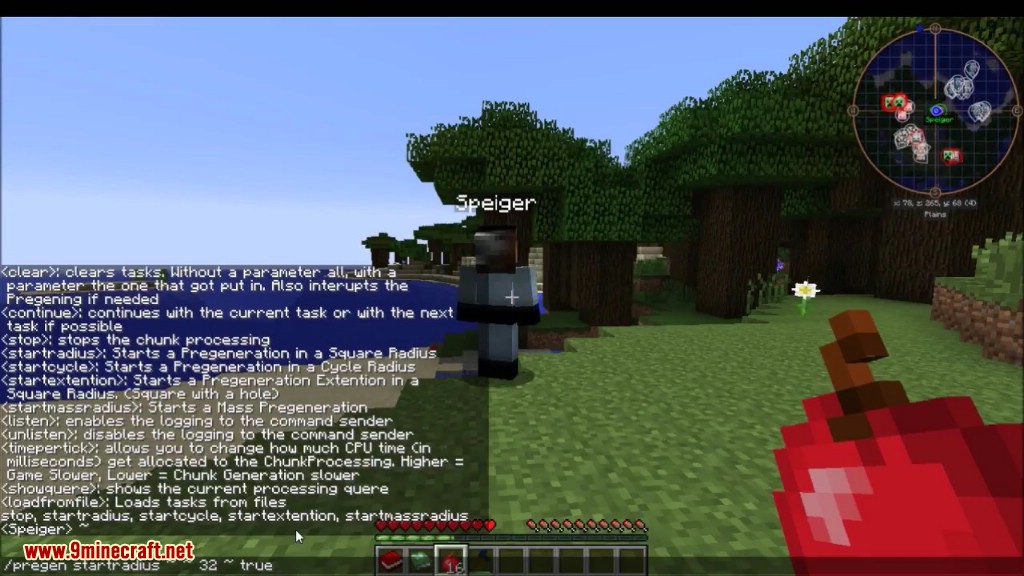

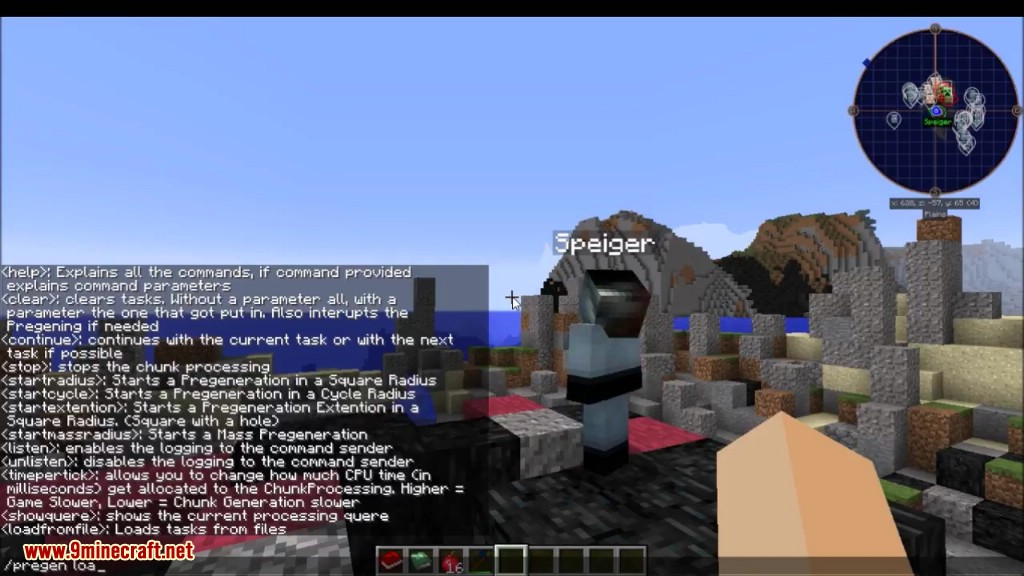
How to use:SpoilerThe Ingame UI or GUI is a feature to allow users to move away from text messages and allow a more focused information flow and easier to understand information overall.
This UI is disabled by default for the tracking and enabled by default for Pregeneration.
But to see that UI/GUI the mod is required on the ClientSide but its not required to play on a server just to draw things.
To Access the GUI when the mod is installed on the Client. Just press the “I” key (can be changed) and this Gui Will show up.
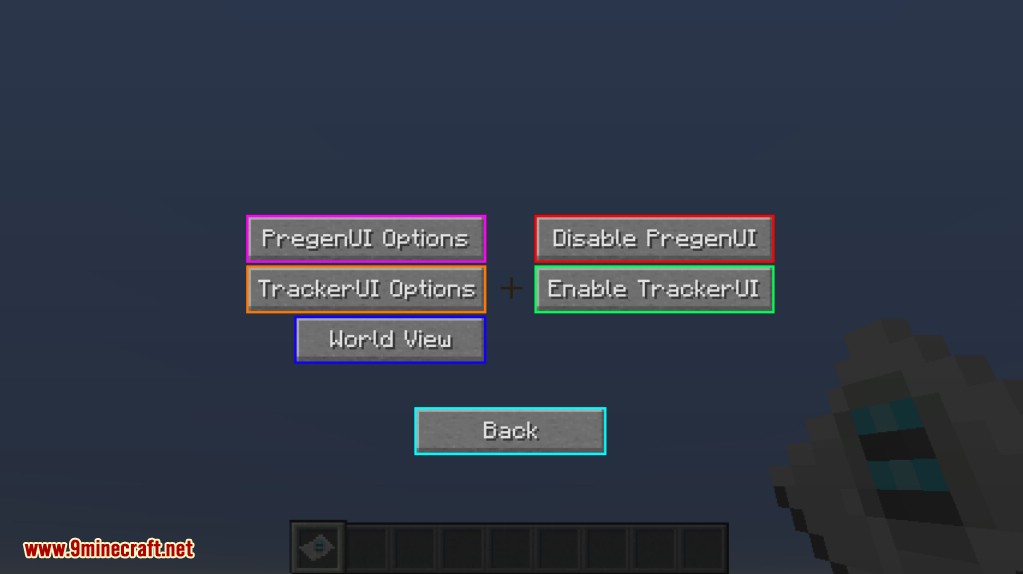
This UI is the Options menu that allows to enable/disable features or edit the contents of the features.
- Disable/Enable PregenUI: Toggles if Pregenerator UI can be seen while the Chunk Pregenerator is running.
- PregenUI Options: Allows to change settings on what information is shown on the Pregenerator UI and where it is placed and which size it is.
- Enable/Disable TrackerUI: Toggles the Profiling UI to display the Player the Profiling information that is being done. (Seeing the Profiling information doesn’t require admin rights but to enable the UI you need admin rights)
- TrackerUI Options: Allows to Change settings on what information is displayed on the Profiling UI and where its placed and how big it is.
- World View: Allows to see detailed information about the World, that information can be on a per chunk or per world basis. To access this tab you require admin rights else the button will be disabled. (On servers the client sends a request packet to validate before enabling the button)
- Back: Goes back into the game screen.
While any of these Guis are open the game does not pause keep that in mind!
When Selecting the UI Options button this Gui will apear:
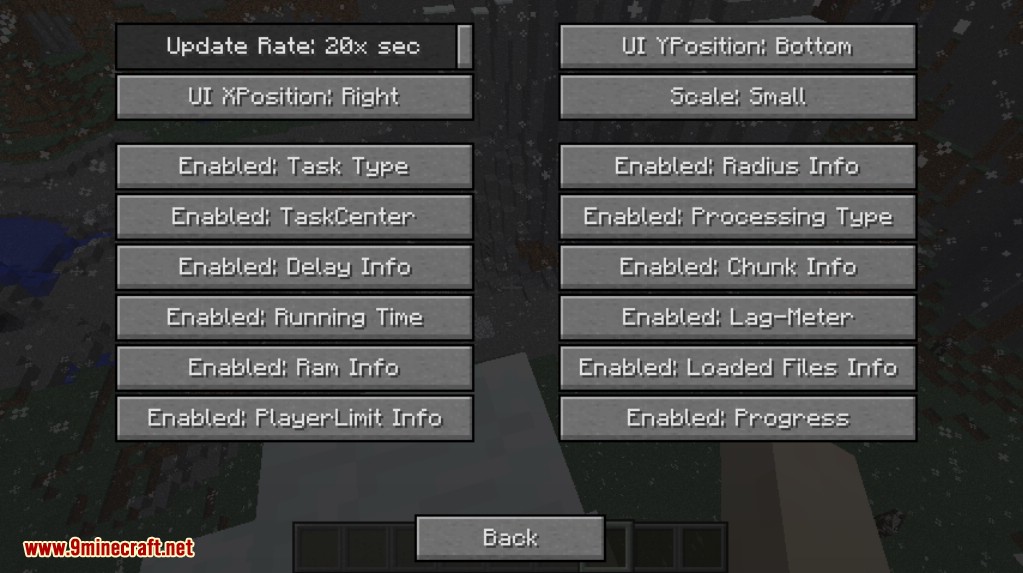
The first list of things are settings that effect the UI directly and not the contents itself.
- Update Rate: The Frequency of how many packets per second with a information request is being sended. Default: 20x a second. Minimum: 1x a second Maximum: 20x a second.
The Request Frequency has no effect on server performance just on client networkusage. - UI YPosition: Where the UI should sit in the screen on the Y Axis. The 3 Options are: Bottom, Top, Center. Default: Bottom.
- UI XPosition: Where the UI should sit in the screen on the X Axis, The 3 Options are: Left, Right, Center. Default: Right
- Scale: This defines if the Gui Should be big or small. Defaults: Small
The second part decides on what information is being displayed.
- Enable/Disable TaskType: Which type of Generation it is: A AreaGeneration, a Radius Generation, a Circle Generation etc.
- Enable/Disable Radius Info: Shows how large this pregeneration at the moment is.
- Enable/Disable TaskCenter: Shows where the center of the Pregeneration is (in chunks)
- Enable/Disable Processing Type: Which type of Generation it is: Terrain Only, PostProcessing (with Terrain or without) or if it blocks PostProcessing.
- Enable/Disable Delay Info: Shows if the current task is prevented to run for a certain amount of time. (is only visible if a delay is present)
- Enable/Disable Chunk Info: Shows how many Chunks in the Dimension that the Pregenerator is running in are loaded at any given time. (To Prevent show if there a problem somehow so crashes can be prevented)
- Enable/Disable Running Time: Displays how long the Pregenerator has been running or not running since the start of the task. (Displayed in Days:Hours:Minutes:Seconds)
- Enable/Disable Lag-Meter: Shows how many Milliseconds per game tick are being used and how much is aviable. (If there is a (Paused) that means the tool isnt running because the game lags to much)
- Enable/Disable Ram Info: Shows the Current Usage of Ram and how much is maximum aviable.
- Enable/Disable Loaded Files Info: This info shows how the Current loaded save Files on the Server while running. This number should stay at 20 Files if it goes above 60 for longer then a couple seconds (max 1 minute) then you have a memory leak and the Pregenerator fails to do its job.
- Enable/Disable PlayerLimitInfo: Shows how many Players are online and how many players are required to be online to pause the pregenerator. (Only shows if the info requirement is enabled)
- Enable/Disable Process: Shows how many Chunks are already being generated out of how many should be generate.
All these things can be enabled disabled at any given time without any sort of issues.
Next is the Tracking UI Options which is close to the UI Options but has different settings.
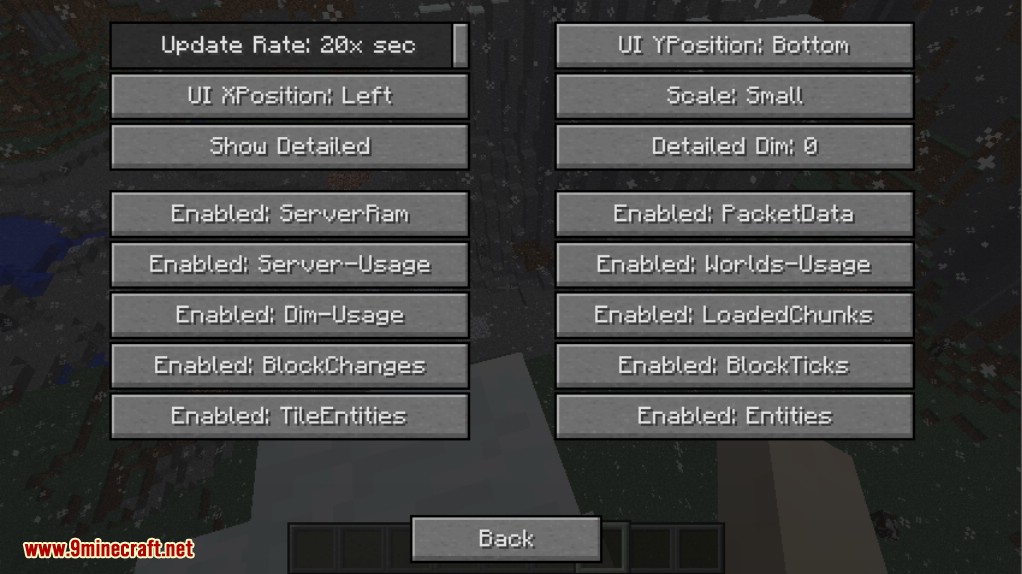
So lets start with the top 6 options.
- Update Rate: The Frequency of how many packets per second with a information request is being sended. Default: 20x a second. Minimum: 1x a second Maximum: 20x a second.
- UI YPosition: Where the UI should sit in the screen on the Y Axis. The 3 Options are: Bottom, Top, Center. Default: Bottom.
- UI XPosition: Where the UI should sit in the screen on the X Axis, The 3 Options are: Left, Right, Center. Default: Left
- Scale: This defines if the Gui Should be big or small. Defaults: Small
- Show Detail: If the Tracker should show a detailed information about the Profiler or if it should be very basic information (Lag, Ram & each worldlag)
- Detailed Dimension: Which dimension the detailed information should target at.
Now lets get the the Informations that can be enabled/disabled.
But here is a tiny difference between the options & tracking options.
There are None Detailed Infos and Detailed infos that either show or not show if detailed info is enabled/disabled.
Side note: If something means average that means it uses the values over 40 ingame ticks and combines those values and devides it by 40 to get an average.
Lets start with the none detailed ones:
- Enable/Disable ServerRam: Shows the Ram information about the server. How much is provided and how much is being used.
- Enable/Disable PacketData: Shows how many packets the server received and processed. (Note not every single packet that the server receives get processed by the server itself that only happens if it is needed that the packet gets processed in snyc with the world)
- Enable/Disable Server Usage: Shows the Average ms that the server uses and also the TPS of the server at that point.
- Enable/Disable Worlds-Usage: Displays the Average ms that each world uses. This can be a big one so be warned.
Now we get to the Detailed infos.
- Enable/Disable Dim-Usage: Displays the Average & lastTick usage of the selected world.
- Enable/Disable LoadedChunks: Displays the LoadedChunk count of the selected world.
- Enable/Disable BlockChanges: Diplays how many setBlockCalls with blockUpdates are being done on average and last tick. (This can be a lag source since crops & farms do these a lot)
- Enable/Disable BlockTicks: Displays how many Requested BlockDelay Ticks are in the list of to process. (For example what a repeater uses to delay itself), MC in 1.8.9 or older can only process 1000 Of these per game tick while 1.10.2 or newer process 65k per tick if this number keeps growing without stopping that means there is a issue. What to also keep in mind is that the ticks are not executed instantly so there can be a bunch of them ready but being processed like 1 minute later.
- Enable/Disable TileEntities: This Displays the LoadedTileEntity Count & Ticking TileEntity count in the dimension.
- Enable/Disable Entities: This Displays the Loaded Entities count in the Dimension.
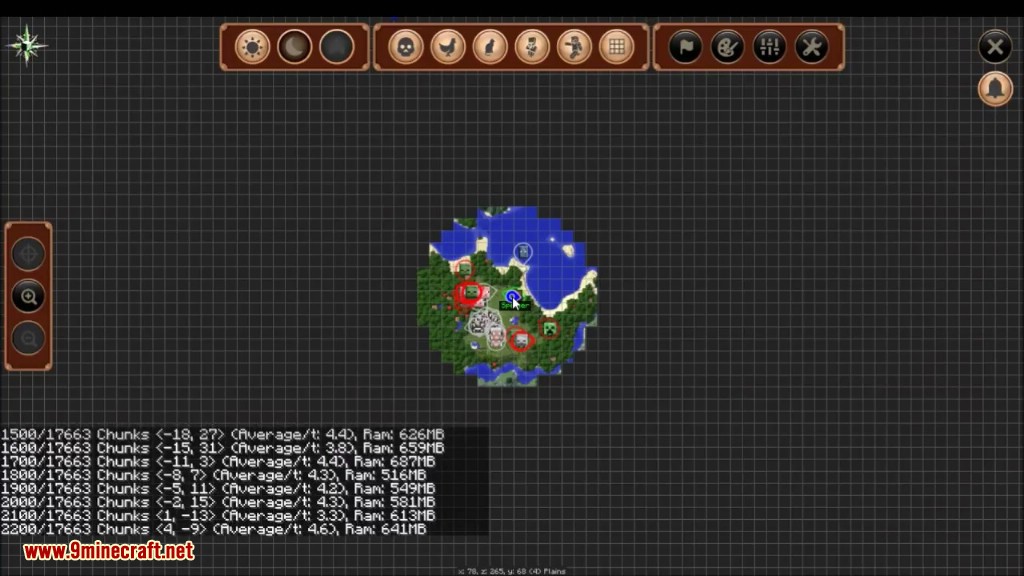
Next the Chunk View button is on the list, when this button is pressed then this gui shows up:
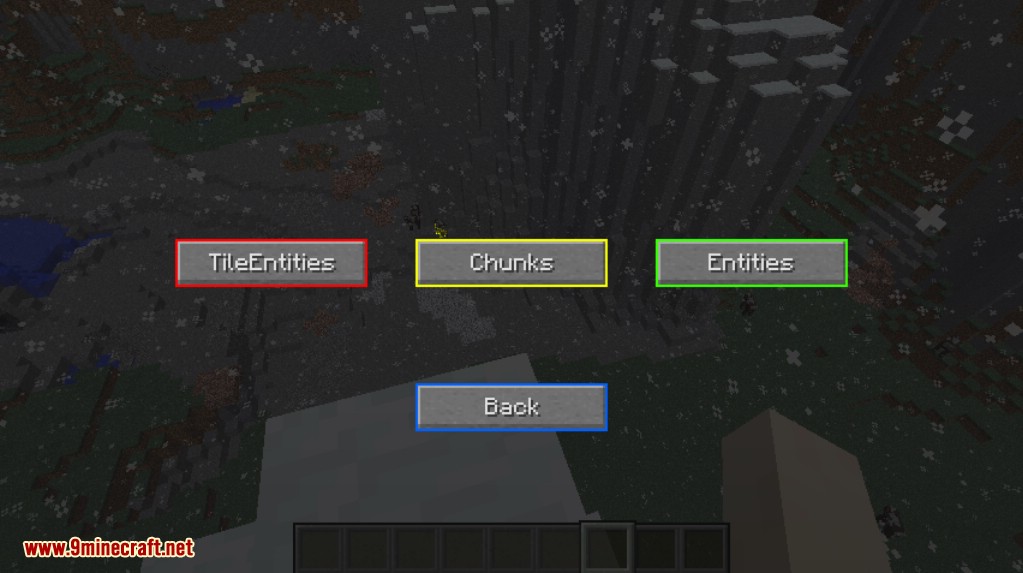
So there is 4 Options to select from:
- Chunks: Which allows you to see detailed info about every single Chunk and its contents,
- TileEntities: Which lists every single TileEntity type and how many of them are there,
- Entities: Which lists every single Entity Type and how many of them are there
- Back: Which opens up the previouse Gui Screen.
Lets do Chunk View since that is the most complex one and we get a lot of the stuff out of the way after we are done:
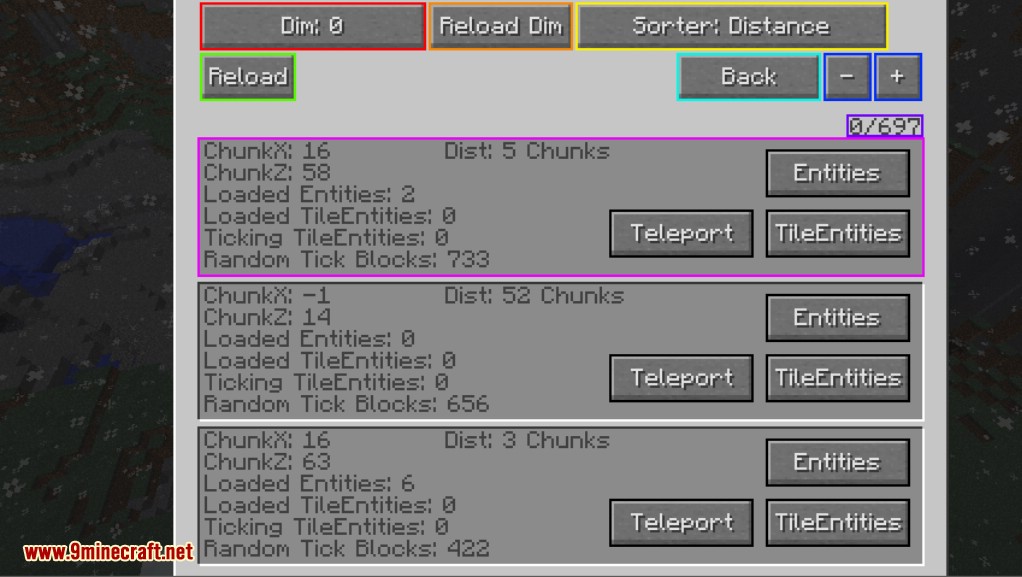
This Gui Lists you a lot of things and also uses a lot of resources of your server.
First of all When the gui is the first time opened its is blank and also displays that the reload button needs to be pressed.
The Reason: To collect this data the server has to process every single chunk of and sort everything together (in sync with the game) and then split the data so that no Packet gets overfilled with data and cause a crash. And when you have 10000 chunks loaded that can cause a lot of packets to be send. So this has to be updated manually. This also has the side effect that there is a snapshot of all the chunks how they were and all of the things.
But now lets get started on the Buttons:
- Dimension Button: Allows to select which dimension the server should collect the data for (wipes the current data on the client and requires a reload click when used). When clicked without shift it goes up in the list while pressed with shift it goes backwards through the list.
- ReloadDims Button: To Prevent network lag the Aviable dimensions are being collected once on the open of the Gui, but dimensions can load/unload dynamicly pressing this button updates the list of aviable dimensions for the user to choose from.
- Reload Button: Tells the Server to collect the data for that client, note Lagspikes can happen through this button since it will process every single chunk (even so it is optimized).
- Sorter Button: Allows to Sort the Chunks by certain elements: (Distance, TileEntityCount, TickingTileEntityCount, EntityCount, RandomBlockTicks Blocks) Pressing it without shift causes it to sort, Pressing it with Shift cycles through the options.
- Back Button: Goes back to the Previouse Gui.
- +- Buttons: Allows to go back and forth through the list of objects. (Note Scrollweel also works to do it faster)
- 0/697 Text: Shows you where you are in the list and how many Chunks are provided at this given time.
- Entities Button: Displays all the Different Entity Types and their count for that chunk.
- TileEntities Button: Displays all the Different TileEntity Types and their count for that chunk.
- Teleport Button: Teleports the Player directly to that Chunk.
Now lets go into the Pink area which displays all the information about each chunk.
First Chunk X & Z and Distance are there for the Position of the Chunk in Chunk Position and how far away the Player is from that Chunk. When pressing Shift that info is converted to block distances.
LoadedEntities & TileEntities & Ticking TileEntities shows the information how many of these are actually present inside of that Chunk and for further detail the Tile/Entities Button can be pressed.
The Random Tick Blocks are a display how many blocks actually want random ticks in that chunk allowing to track down chunks that have especially high one of these. (Crops/Leaves/Grass and other things use that methode)
Now lets go into the Tile/Entity view and look what is there. This shows off only the TileEntity view since both are equal in design and functionality. It dislays just entities instead of TileEntities.
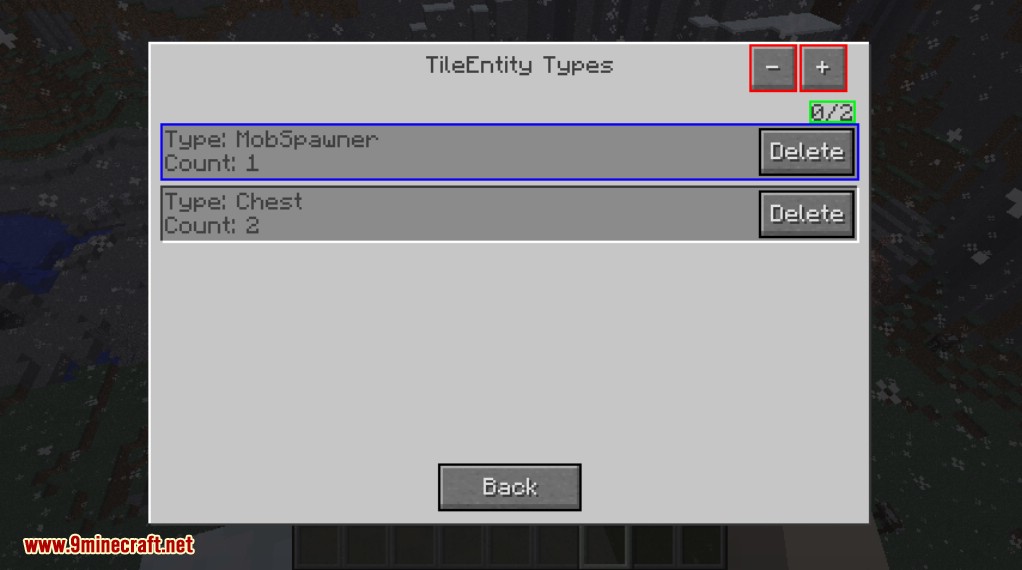
This Gui provides you information for each Tile/Entity type (their registry name) and how many are there in their chunk.
To keep it quick +- Button or scroll weel allow you to move around on the list.
The 0 / 2 is where you are at.
And the Delete button removes the Tile/Entities of that type in the Chunk and Prints out how many it had Deleted. With Entities that can be tricky since these can move out of the Chunk While you gain the data so they are in but on the deletion pressing its not in there anymore.
For TileEntities that is not a problem. But when you delete Chests or Furnaces they Drop their Items on to the Ground. Keep that in mind. Also the Block gets replaced with air too so it removes the TileEntity and the Block!.
Now lets get to the Last GUI and thats the Entity/TileEntity View. These are again combined in the documentation because they are equal but infos just are different.
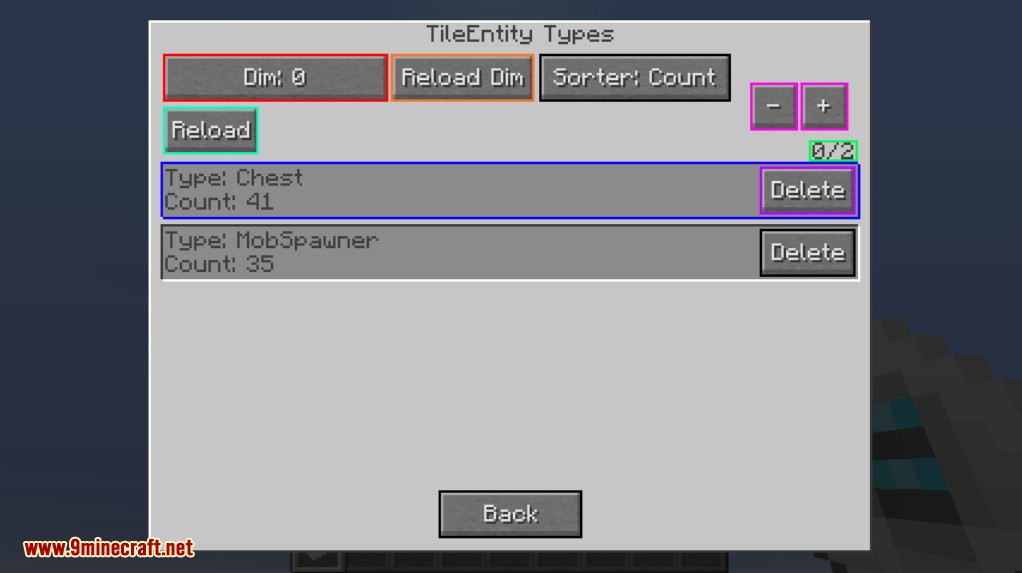
This Gui works basically like the Chunk Gui and Entities/TileEntities Gui
You have a Reload/Dimension/DimensionReload button that handles like in the Chunks Gui.
But it displays Entities/TileEntities for the Entire Dimension instead of a Per Chunk Basis.
The +- buttons or Scrollwheel to go up and down on the list. The 0 / 2 to show off at which point in the list you are and then the Type and count for which entity/tileentity is being represented.
There is also a newly added sort button sort button that allows to sort between the name and the count of Entities/TileEntities.
And a Delete Button for removing entirely out of the world.
And the Back Button that to go back to the Previouse Screen.
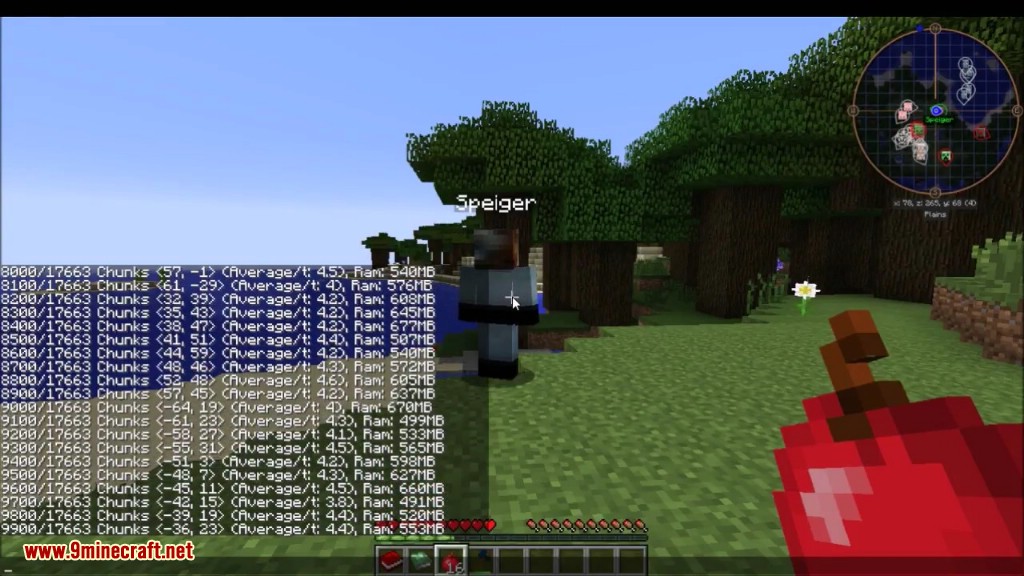
While the process is going you will receive a lot of these messages:
9400/10000 Chunks <41, 11> (Average/t: 2,7), Ram: 798MB
Here is a explaination about this:
- 9400/10000 Chunks: Current Progress.
- <41, 11>: Current Position of the Pregenerator..
- (Average/t: 2,7): Average Chunk Generation Speed
- Ram: 798MB: Current Ram usage
Requires:
Chunk Pregenerator Mod 1.16.5 | 1.17.1 Download Links:For Minecraft 1.7.2
For Minecraft 1.7.10
For Minecraft 1.8.9
For Minecraft 1.10.2
For Minecraft 1.11.2/1.11
For Minecraft 1.12.2, 1.12.1, 1.12
For Minecraft 1.14.4
For Minecraft 1.15.2
For Minecraft 1.16.3
Fabric version: Download from Server 1 – Download from Server 2
For Minecraft 1.16.4
Fabric version: Download from Server 1 – Download from Server 2
Forge version: Download from Server 1 – Download from Server 2
For Minecraft 1.16.5
Fabric version: Download from Server 1 – Download from Server 2
Forge version: Download from Server 1 – Download from Server 2
For Minecraft 1.17
Fabric version: Download from Server 1 – Download from Server 2
The Ingame UI or GUI is a feature to allow users to move away from text messages and allow a more focused information flow and easier to understand information overall.
This UI is disabled by default for the tracking and enabled by default for Pregeneration.
But to see that UI/GUI the mod is required on the ClientSide but its not required to play on a server just to draw things.
To Access the GUI when the mod is installed on the Client. Just press the “I” key (can be changed) and this Gui Will show up.
This UI is the Options menu that allows to enable/disable features or edit the contents of the features.
- Disable/Enable PregenUI: Toggles if Pregenerator UI can be seen while the Chunk Pregenerator is running.
- PregenUI Options: Allows to change settings on what information is shown on the Pregenerator UI and where it is placed and which size it is.
- Enable/Disable TrackerUI: Toggles the Profiling UI to display the Player the Profiling information that is being done. (Seeing the Profiling information doesn’t require admin rights but to enable the UI you need admin rights)
- TrackerUI Options: Allows to Change settings on what information is displayed on the Profiling UI and where its placed and how big it is.
- World View: Allows to see detailed information about the World, that information can be on a per chunk or per world basis. To access this tab you require admin rights else the button will be disabled. (On servers the client sends a request packet to validate before enabling the button)
- Back: Goes back into the game screen.
While any of these Guis are open the game does not pause keep that in mind!
When Selecting the UI Options button this Gui will apear:
The first list of things are settings that effect the UI directly and not the contents itself.
- Update Rate: The Frequency of how many packets per second with a information request is being sended. Default: 20x a second. Minimum: 1x a second Maximum: 20x a second.
The Request Frequency has no effect on server performance just on client networkusage. - UI YPosition: Where the UI should sit in the screen on the Y Axis. The 3 Options are: Bottom, Top, Center. Default: Bottom.
- UI XPosition: Where the UI should sit in the screen on the X Axis, The 3 Options are: Left, Right, Center. Default: Right
- Scale: This defines if the Gui Should be big or small. Defaults: Small
The second part decides on what information is being displayed.
- Enable/Disable TaskType: Which type of Generation it is: A AreaGeneration, a Radius Generation, a Circle Generation etc.
- Enable/Disable Radius Info: Shows how large this pregeneration at the moment is.
- Enable/Disable TaskCenter: Shows where the center of the Pregeneration is (in chunks)
- Enable/Disable Processing Type: Which type of Generation it is: Terrain Only, PostProcessing (with Terrain or without) or if it blocks PostProcessing.
- Enable/Disable Delay Info: Shows if the current task is prevented to run for a certain amount of time. (is only visible if a delay is present)
- Enable/Disable Chunk Info: Shows how many Chunks in the Dimension that the Pregenerator is running in are loaded at any given time. (To Prevent show if there a problem somehow so crashes can be prevented)
- Enable/Disable Running Time: Displays how long the Pregenerator has been running or not running since the start of the task. (Displayed in Days:Hours:Minutes:Seconds)
- Enable/Disable Lag-Meter: Shows how many Milliseconds per game tick are being used and how much is aviable. (If there is a (Paused) that means the tool isnt running because the game lags to much)
- Enable/Disable Ram Info: Shows the Current Usage of Ram and how much is maximum aviable.
- Enable/Disable Loaded Files Info: This info shows how the Current loaded save Files on the Server while running. This number should stay at 20 Files if it goes above 60 for longer then a couple seconds (max 1 minute) then you have a memory leak and the Pregenerator fails to do its job.
- Enable/Disable PlayerLimitInfo: Shows how many Players are online and how many players are required to be online to pause the pregenerator. (Only shows if the info requirement is enabled)
- Enable/Disable Process: Shows how many Chunks are already being generated out of how many should be generate.
All these things can be enabled disabled at any given time without any sort of issues.
Next is the Tracking UI Options which is close to the UI Options but has different settings.
So lets start with the top 6 options.
- Update Rate: The Frequency of how many packets per second with a information request is being sended. Default: 20x a second. Minimum: 1x a second Maximum: 20x a second.
- UI YPosition: Where the UI should sit in the screen on the Y Axis. The 3 Options are: Bottom, Top, Center. Default: Bottom.
- UI XPosition: Where the UI should sit in the screen on the X Axis, The 3 Options are: Left, Right, Center. Default: Left
- Scale: This defines if the Gui Should be big or small. Defaults: Small
- Show Detail: If the Tracker should show a detailed information about the Profiler or if it should be very basic information (Lag, Ram & each worldlag)
- Detailed Dimension: Which dimension the detailed information should target at.
Now lets get the the Informations that can be enabled/disabled.
But here is a tiny difference between the options & tracking options.
There are None Detailed Infos and Detailed infos that either show or not show if detailed info is enabled/disabled.
Side note: If something means average that means it uses the values over 40 ingame ticks and combines those values and devides it by 40 to get an average.
Lets start with the none detailed ones:
- Enable/Disable ServerRam: Shows the Ram information about the server. How much is provided and how much is being used.
- Enable/Disable PacketData: Shows how many packets the server received and processed. (Note not every single packet that the server receives get processed by the server itself that only happens if it is needed that the packet gets processed in snyc with the world)
- Enable/Disable Server Usage: Shows the Average ms that the server uses and also the TPS of the server at that point.
- Enable/Disable Worlds-Usage: Displays the Average ms that each world uses. This can be a big one so be warned.
Now we get to the Detailed infos.
- Enable/Disable Dim-Usage: Displays the Average & lastTick usage of the selected world.
- Enable/Disable LoadedChunks: Displays the LoadedChunk count of the selected world.
- Enable/Disable BlockChanges: Diplays how many setBlockCalls with blockUpdates are being done on average and last tick. (This can be a lag source since crops & farms do these a lot)
- Enable/Disable BlockTicks: Displays how many Requested BlockDelay Ticks are in the list of to process. (For example what a repeater uses to delay itself), MC in 1.8.9 or older can only process 1000 Of these per game tick while 1.10.2 or newer process 65k per tick if this number keeps growing without stopping that means there is a issue. What to also keep in mind is that the ticks are not executed instantly so there can be a bunch of them ready but being processed like 1 minute later.
- Enable/Disable TileEntities: This Displays the LoadedTileEntity Count & Ticking TileEntity count in the dimension.
- Enable/Disable Entities: This Displays the Loaded Entities count in the Dimension.
Next the Chunk View button is on the list, when this button is pressed then this gui shows up:
So there is 4 Options to select from:
- Chunks: Which allows you to see detailed info about every single Chunk and its contents,
- TileEntities: Which lists every single TileEntity type and how many of them are there,
- Entities: Which lists every single Entity Type and how many of them are there
- Back: Which opens up the previouse Gui Screen.
Lets do Chunk View since that is the most complex one and we get a lot of the stuff out of the way after we are done:
This Gui Lists you a lot of things and also uses a lot of resources of your server.
First of all When the gui is the first time opened its is blank and also displays that the reload button needs to be pressed.
The Reason: To collect this data the server has to process every single chunk of and sort everything together (in sync with the game) and then split the data so that no Packet gets overfilled with data and cause a crash. And when you have 10000 chunks loaded that can cause a lot of packets to be send. So this has to be updated manually. This also has the side effect that there is a snapshot of all the chunks how they were and all of the things.
But now lets get started on the Buttons:
- Dimension Button: Allows to select which dimension the server should collect the data for (wipes the current data on the client and requires a reload click when used). When clicked without shift it goes up in the list while pressed with shift it goes backwards through the list.
- ReloadDims Button: To Prevent network lag the Aviable dimensions are being collected once on the open of the Gui, but dimensions can load/unload dynamicly pressing this button updates the list of aviable dimensions for the user to choose from.
- Reload Button: Tells the Server to collect the data for that client, note Lagspikes can happen through this button since it will process every single chunk (even so it is optimized).
- Sorter Button: Allows to Sort the Chunks by certain elements: (Distance, TileEntityCount, TickingTileEntityCount, EntityCount, RandomBlockTicks Blocks) Pressing it without shift causes it to sort, Pressing it with Shift cycles through the options.
- Back Button: Goes back to the Previouse Gui.
- +- Buttons: Allows to go back and forth through the list of objects. (Note Scrollweel also works to do it faster)
- 0/697 Text: Shows you where you are in the list and how many Chunks are provided at this given time.
- Entities Button: Displays all the Different Entity Types and their count for that chunk.
- TileEntities Button: Displays all the Different TileEntity Types and their count for that chunk.
- Teleport Button: Teleports the Player directly to that Chunk.
Now lets go into the Pink area which displays all the information about each chunk.
First Chunk X & Z and Distance are there for the Position of the Chunk in Chunk Position and how far away the Player is from that Chunk. When pressing Shift that info is converted to block distances.
LoadedEntities & TileEntities & Ticking TileEntities shows the information how many of these are actually present inside of that Chunk and for further detail the Tile/Entities Button can be pressed.
The Random Tick Blocks are a display how many blocks actually want random ticks in that chunk allowing to track down chunks that have especially high one of these. (Crops/Leaves/Grass and other things use that methode)
Now lets go into the Tile/Entity view and look what is there. This shows off only the TileEntity view since both are equal in design and functionality. It dislays just entities instead of TileEntities.
This Gui provides you information for each Tile/Entity type (their registry name) and how many are there in their chunk.
To keep it quick +- Button or scroll weel allow you to move around on the list.
The 0 / 2 is where you are at.
And the Delete button removes the Tile/Entities of that type in the Chunk and Prints out how many it had Deleted. With Entities that can be tricky since these can move out of the Chunk While you gain the data so they are in but on the deletion pressing its not in there anymore.
For TileEntities that is not a problem. But when you delete Chests or Furnaces they Drop their Items on to the Ground. Keep that in mind. Also the Block gets replaced with air too so it removes the TileEntity and the Block!.
Now lets get to the Last GUI and thats the Entity/TileEntity View. These are again combined in the documentation because they are equal but infos just are different.
This Gui works basically like the Chunk Gui and Entities/TileEntities Gui
You have a Reload/Dimension/DimensionReload button that handles like in the Chunks Gui.
But it displays Entities/TileEntities for the Entire Dimension instead of a Per Chunk Basis.
The +- buttons or Scrollwheel to go up and down on the list. The 0 / 2 to show off at which point in the list you are and then the Type and count for which entity/tileentity is being represented.
There is also a newly added sort button sort button that allows to sort between the name and the count of Entities/TileEntities.
And a Delete Button for removing entirely out of the world.
And the Back Button that to go back to the Previouse Screen.
While the process is going you will receive a lot of these messages:
9400/10000 Chunks <41, 11> (Average/t: 2,7), Ram: 798MB
Here is a explaination about this:
- 9400/10000 Chunks: Current Progress.
- <41, 11>: Current Position of the Pregenerator..
- (Average/t: 2,7): Average Chunk Generation Speed
- Ram: 798MB: Current Ram usage
Chunk Pregenerator Mod 1.16.5 | 1.17.1 Download Links:
For Minecraft 1.7.2
For Minecraft 1.7.10
For Minecraft 1.8.9
For Minecraft 1.10.2
For Minecraft 1.11.2/1.11
For Minecraft 1.12.2, 1.12.1, 1.12
For Minecraft 1.14.4
For Minecraft 1.15.2
For Minecraft 1.16.3
Fabric version: Download from Server 1 – Download from Server 2
For Minecraft 1.16.4
Fabric version: Download from Server 1 – Download from Server 2
Forge version: Download from Server 1 – Download from Server 2
For Minecraft 1.16.5
Fabric version: Download from Server 1 – Download from Server 2
Forge version: Download from Server 1 – Download from Server 2
For Minecraft 1.17
Fabric version: Download from Server 1 – Download from Server 2
How to install Minecraft Forge
Minecraft Forge is a Modding API that makes it very easy to install a number of different Minecraft mods. Follow 5 steps below to install Forge :
1. Visit the Forge website, choose the Minecraft version you would like to run from the sidebar on the left, then download the installer.
2. Open the .jar file you have just downloaded, make sure ‘Install client’ is selected and click OK. Once this has finished you will see a success message.
3. Launch Minecraft and select the Forge profile then click Play.
If so, congratulations, you have successfully installed Minecraft Forge
